


WooCommerce
- home
- Apps
- WooCommerce
- Troubleshooting
Troubleshooting
Orders Not Received in HubRise
The first step to receive orders in HubRise is to connect WooCommerce to HubRise. If you have not done so, follow the steps in Connect to HubRise first.
If you have connected WooCommerce to HubRise, but you are not receiving orders in HubRise, check the following common issues.
Check WooCommerce Webhooks
When you connect WooCommerce Bridge, it creates two webhooks on your WooCommerce website. These webhooks are essential to transmit orders from WooCommerce to HubRise.
Not only should you verify the presence of these webhooks, but you also need to ensure that their status is Active. If the status is Inactive, the webhooks will not work. You will need to reactivate them by clicking on their names.
If you find the webhooks have been disabled, this often indicates that WooCommerce has not been configured to prevent automatic webhook disabling - see Webhooks Automatically Disabled below.
To check that the webhooks have been created:
- Open your WooCommerce back office.
- From the left navigation panel, click WooCommerce > Settings > Advanced.
- Then click on Webhooks.
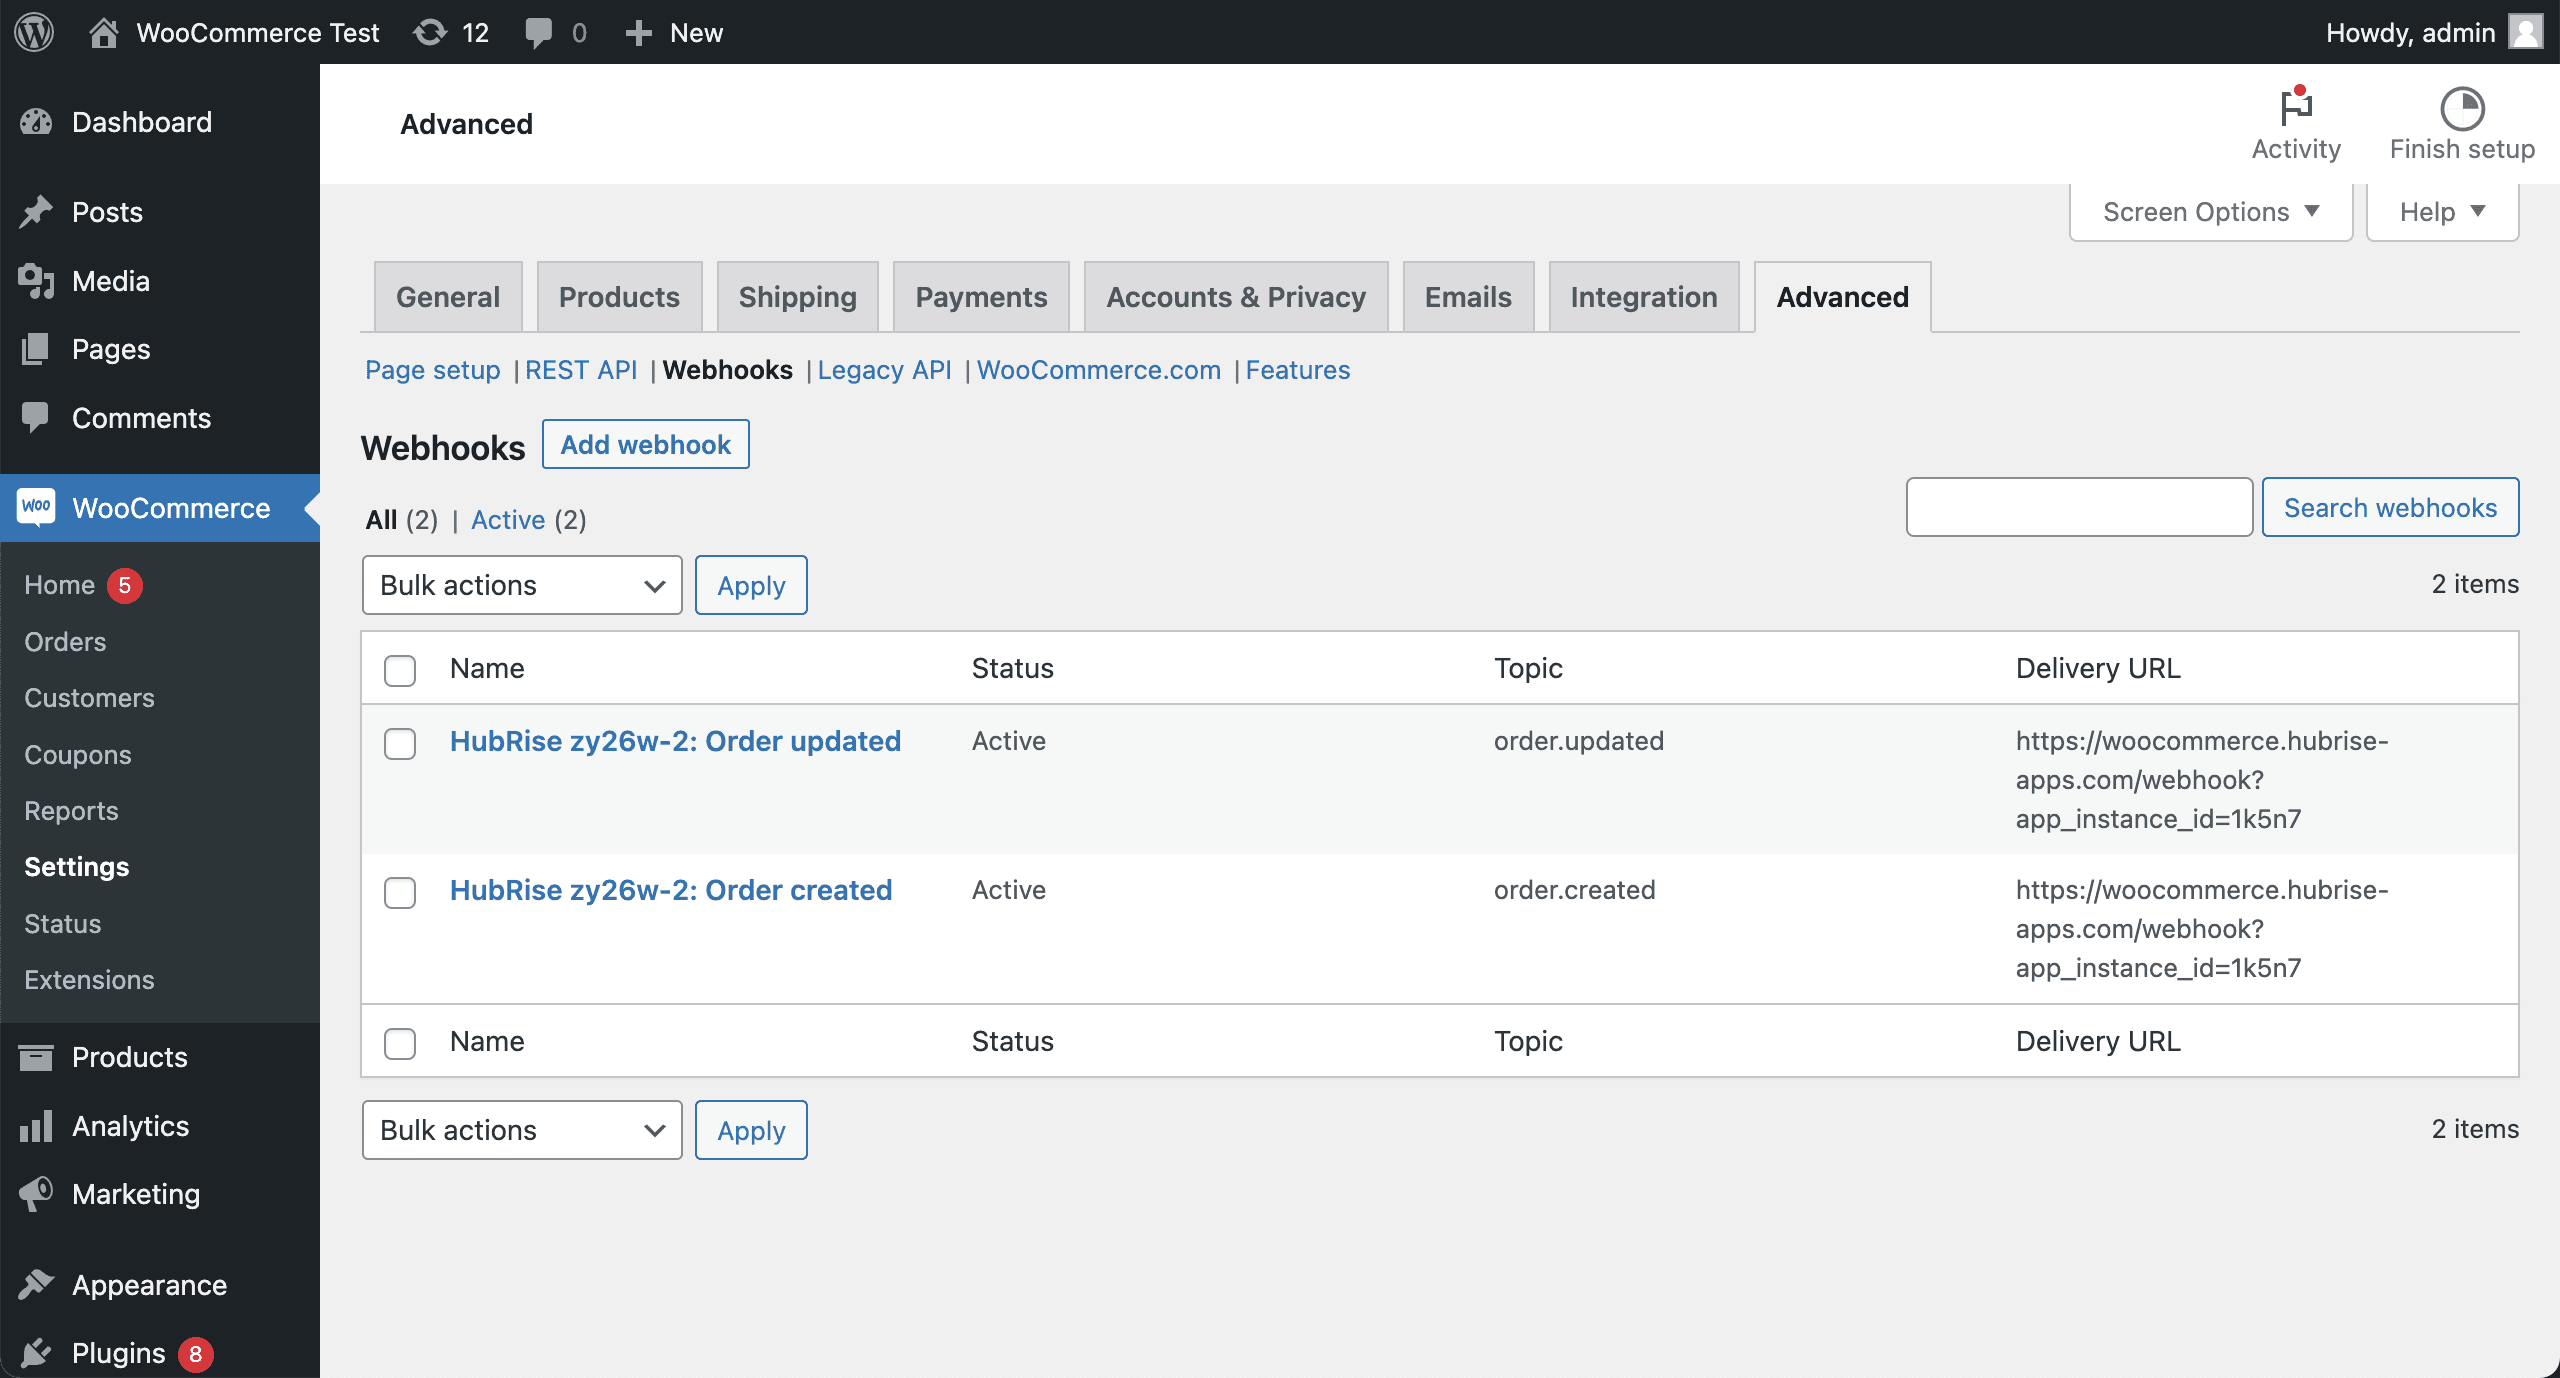
- Find two entries with the following names:
HubRise {{your_location_id}}: Order updatedHubRise {{your_location_id}}: Order created
- Check the status of each entry. If any of them are set to Inactive, click on their names to change the status to Active.
If these entries are present and active, it is a good sign that the connection to HubRise was successfully established. You can proceed to the next verification step.
If you cannot find the two entries, you need to reconnect the bridge and check WooCommerce webhooks again. For more information on connecting the bridge, see Connect to HubRise.
Check WooCommerce Logs
If the webhooks are present and active but orders are still not being received, check the WooCommerce logs for more details:
- Navigate to WooCommerce > Status > Logs in your WooCommerce back office.
- Check the
webhooks-deliverylog from the day of the order to verify if webhook calls were made to HubRise. - Review the
fatal-errorslog for any issues around that time. - Check the specific
place-order-debug-[id]log for that order if available.
Remember to account for timezone differences: WooCommerce logs use the server's timezone (such as UTC), while WooCommerce Bridge logs use local time.
For more details on WooCommerce logs, see WooCommerce Logs.
Webhooks Automatically Disabled
If your WooCommerce webhooks are being automatically disabled, this is likely due to repeated delivery failures. By default, WooCommerce disables webhooks after 5 consecutive failed attempts.
To prevent webhooks from being disabled automatically, see detailed instructions in Prevent Automatic Webhook Disabling in the Connect to HubRise documentation.
If webhooks have already been disabled, you'll need to manually reactivate them by following the steps in Check WooCommerce Webhooks above.
Error 422 - Private Ref Already Used
When WooCommerce orders fail to sync with HubRise, you may encounter a 422 error with the following response body:
{ "message": "Validation failed", "errors": [ { "field": "/private_ref", "message": "is already used ('21824' given)" } ], "error_type": "unprocessable_entity"}
This error indicates that the order ID (private_ref) being sent is already in use. This typically happens after a database restore in WooCommerce, which resets the auto-increment value for the wp_posts table, causing new orders to have duplicate IDs.
To resolve this issue:
- Use the SQL query tool to find the highest ID in your posts table (see Using the SQL Query Tool).
- Update the auto-increment value to be 1 higher than the current highest ID.
- Place a test order to verify the issue is resolved.
Place a Test Order in WooCommerce
To verify the connection between WooCommerce and HubRise, place a test order in WooCommerce and check that it is transmitted to HubRise.
- Open your WooCommerce back office.
- From the top menu, click Visit Store. This will open your WooCommerce website.
- Place an order on your WooCommerce website.
- Return to your WooCommerce back office, and from the left navigation panel click WooCommerce > Orders. The new order will be present.
When WooCommerce is connected to HubRise, orders placed in WooCommerce should be transmitted to HubRise immediately.
To verify that your test order was transmitted to HubRise, follow these steps:
- Open your HubRise back office.
- Navigate to the DATA > ORDERS page.
- Find your test order within.
If you can see the order, the connection between WooCommerce and HubRise is working correctly.
Orders Received in HubRise With a Delay
By default, WooCommerce processes webhooks asynchronously, which can delay order transmission to HubRise by several minutes.
To enable immediate order transmission, you need to configure synchronous webhook delivery. For detailed instructions, see Enable Synchronous Webhook Delivery in the Connect to HubRise documentation.
Catalog Updates Not Working
Orphaned Records
If catalog updates from HubRise to WooCommerce are failing, this could be caused by orphaned records in the wp_wc_product_meta_lookup table, a known WooCommerce bug fixed in version 9.8.
To confirm this is the problem:
- In WooCommerce Bridge, find the failing Catalog push operation (showing error code
400). - Click on the operation to view its details.
- Expand the RESPONSE section to view the error details.
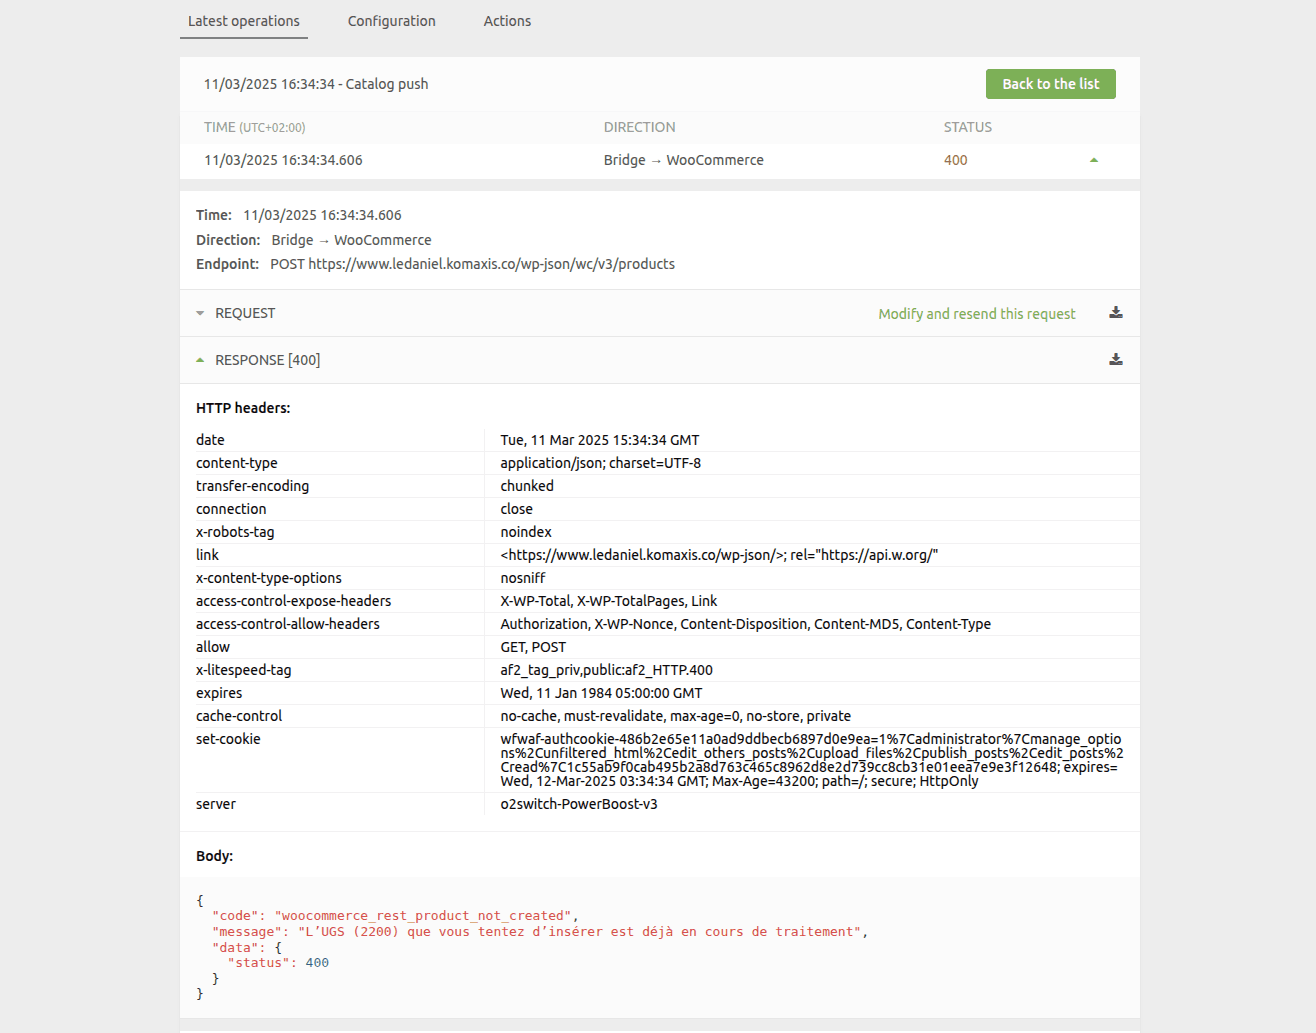
If you see an error message like the following, this confirms the orphaned records issue:
{ "code": "woocommerce_rest_product_not_created", "message": "L'UGS (2200) que vous tentez d'insérer est déjà en cours de traitement", "data": { "status": 400 }}
The error indicates that the SKU you're trying to insert is already being processed, which happens due to orphaned records in the database.
To clean the orphaned records:
-
Install the SQL query tool. Refer to Using the SQL Query Tool.
-
Run this SQL query (replace
wp_with your table prefix):DELETE pm FROM wp_wc_product_meta_lookup pmLEFT JOIN wp_posts p ON pm.product_id = p.IDWHERE p.ID IS NULL OR p.post_status = 'trash' -
Try your catalog update again. It should work now.
To prevent new orphaned records, update WooCommerce to version 9.8 or later, which includes a fix for this issue.
401 Errors
If you see 401 errors in WooCommerce Bridge, it means that WooCommerce Bridge is unable to authenticate with WooCommerce.

There are three common causes for 401 errors:
API Key Removed
If the API key for HubRise has been removed in WooCommerce, it will lead to 401 errors. To check this:
- Open your WordPress dashboard.
- Navigate to WooCommerce > Settings > Advanced > REST API.
- Verify if there is an API key named
HubRise - API.
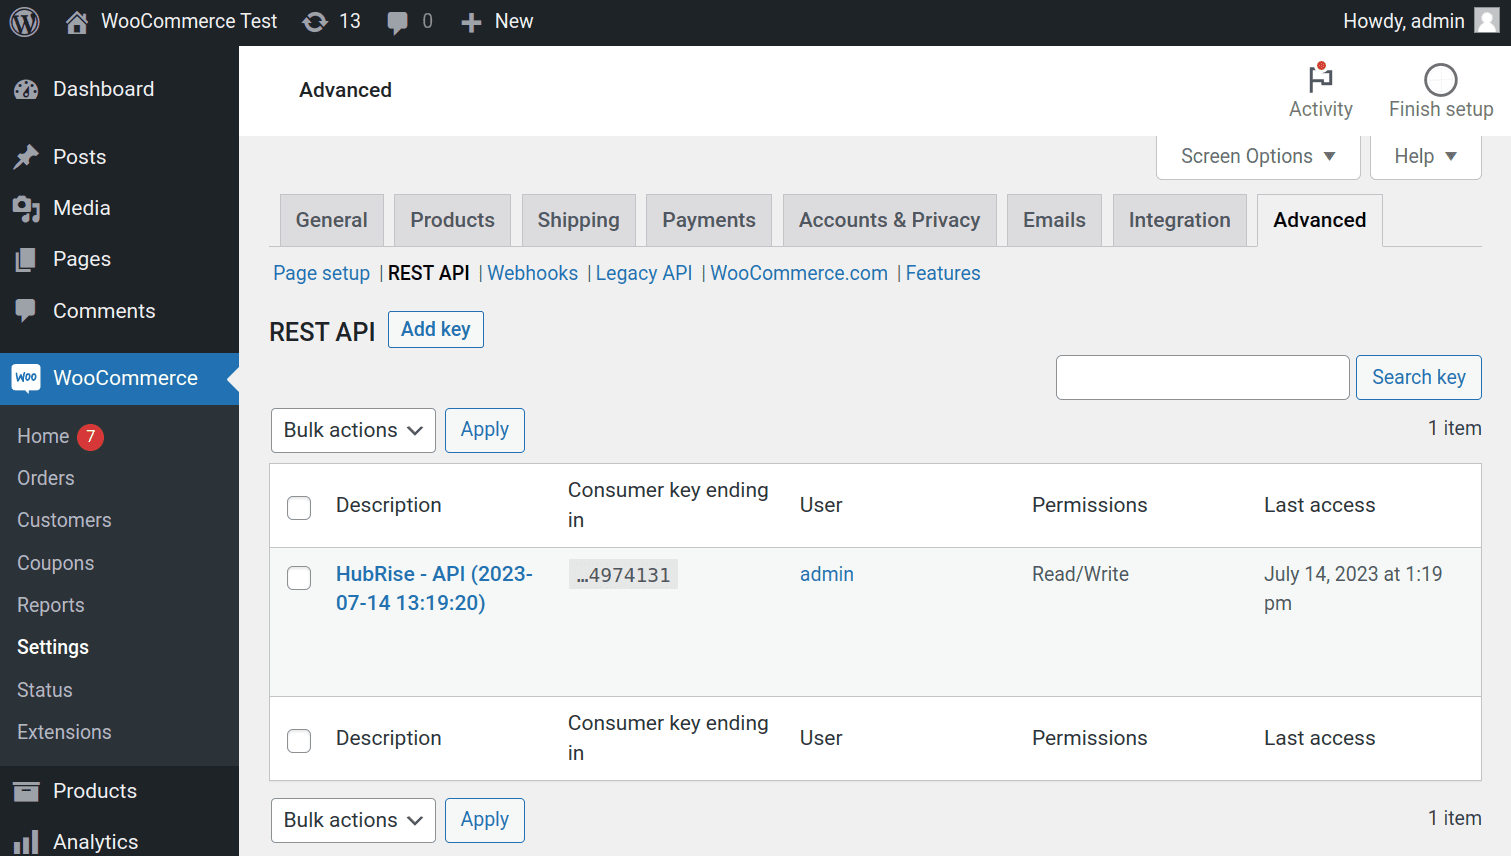
If the HubRise - API key is not present, it means it has been removed, and you need to reconnect the bridge. For more information on connecting the bridge, see Connect to HubRise.
HTTP Basic Authentication Fail
If your WooCommerce setup does not work with the default HTTP Basic authentication method, it may also result in 401 errors. In such cases, you need to switch to the fallback OAuth1 method.
To do this:
- Reset the configuration of WooCommerce Bridge.
- Configure the bridge again from scratch, but when you reach the first step of the configuration, unfold Advanced Options.
- Select the Use OAuth1 option.
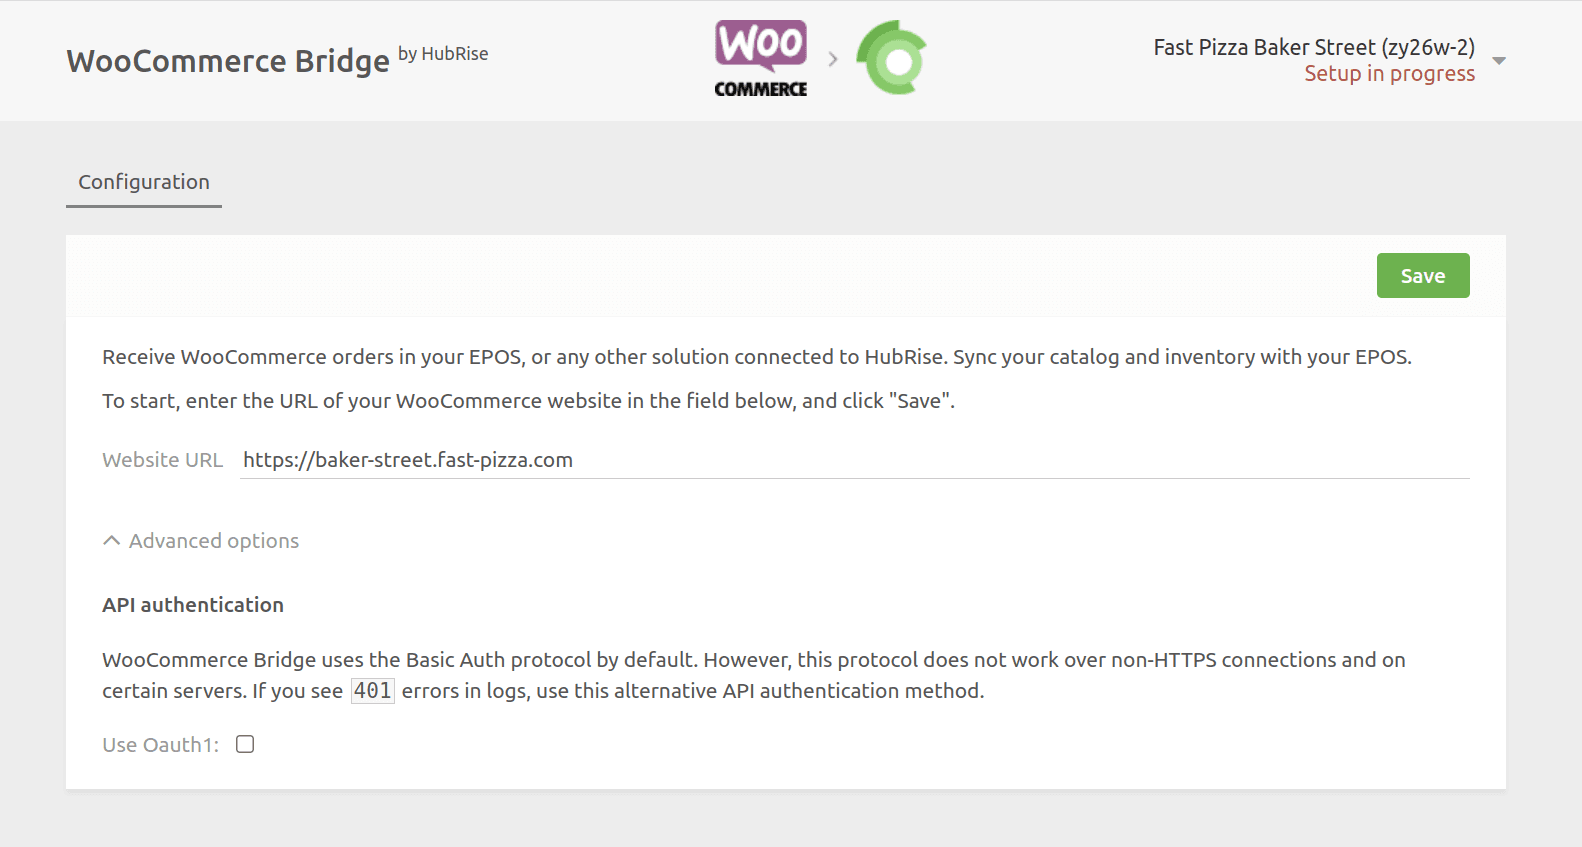
- Proceed with the configuration as described in Connect to HubRise.
After making this change, verify if the 401 errors are resolved.
Incorrect URL During Setup
IMPORTANT NOTE: This issue is only relevant if you are using the OAuth1 authentication method.
During the OAuth1 setup, if you added an extra www or omitted it from your website URL, the WooCommerce API will respond with the JSON message below:
{ "code": "woocommerce_rest_authentication_error", "message": "Signature non valide - La signature fournie ne correspond pas.", "data": { "status": 401 }}
In this case, the error message indicates that the signature provided does not match due to an incorrect URL input. This issue arises only with OAuth1 setup, because it requires the exact URL to compute the request signature, unlike Basic Auth which does not use the URL in the authentication of each request. To resolve this, you need to reconnect and use the exact URL of your website (either with or without the www, as per your actual website URL).
Here is how to correct this:
- Reset the WooCommerce Bridge configuration, see Reset the Configuration for instructions.
- Configure the bridge again from scratch. When you reach the first step of the configuration, enter the correct URL of your WooCommerce store, ensuring the URL matches exactly with your website (pay attention to whether your website uses
wwwor not). - Proceed with the configuration as described in Connect to HubRise.
403 Errors
If you see 403 errors in WooCommerce Bridge logs and notice that GET and POST requests work while PUT, PATCH, or DELETE requests consistently fail, this is typically caused by your web server configuration (for example, Apache or Nginx) blocking certain HTTP methods. Review your server configuration files to ensure PUT, PATCH, and DELETE methods are allowed for the /wp-json/* endpoints.
WooCommerce Logs
WooCommerce logs provide information about webhook deliveries, order processing, and server errors.
Accessing the Logs
To view WooCommerce logs:
- Open your WooCommerce back office.
- Navigate to WooCommerce > Status > Logs.
- The page displays available log files. Use the pagination controls at the bottom to navigate to older logs.
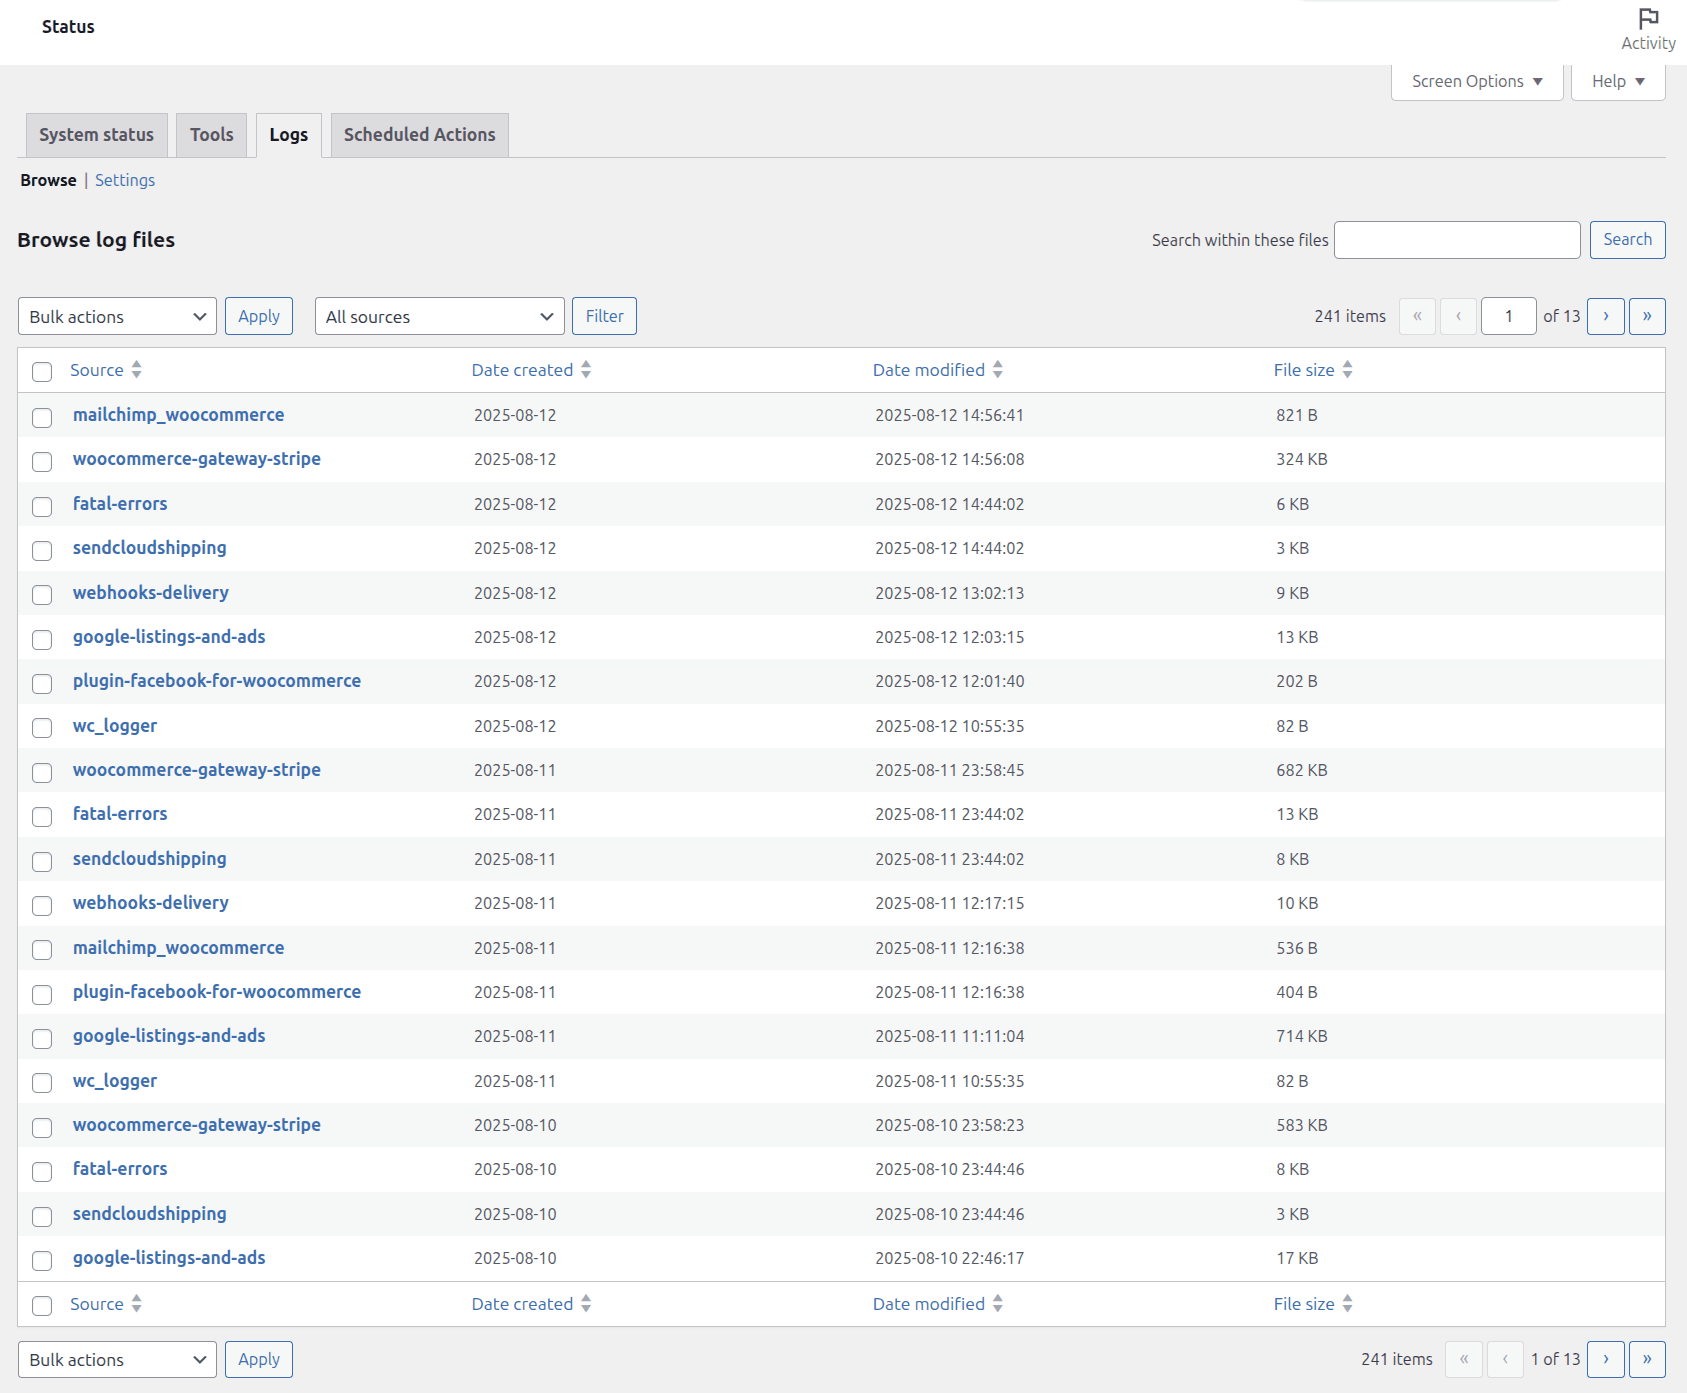
Log Files to Check
Look for the log files created around the time of the issue you're investigating. If the issue is older than the available logs, consider extending the retention period in the log settings.
Focus on the following log sources:
-
webhooks-delivery: Shows each webhook call to HubRise. While the content may be obfuscated, the timestamps are useful for verifying if webhooks were actually sent. Note that times are displayed in the server's timezone (often UTC).
-
fatal-errors: Check this log for any critical issues that might have occurred during order processing or webhook delivery.
-
place-order-debug-[id]: Each order creates its own log file with a unique ID suffix (e.g.,
place-order-debug-9da29b23). These logs contain detailed timing and status information for a specific order.
Log Settings
To adjust log retention and other settings:
- From the Logs page, click Settings at the top.
- Consider setting the retention period to 30 days or more to ensure sufficient history.
- Consider setting the logging level threshold to None to capture all events. This may generate larger log files.
Using the SQL Query Tool
Several troubleshooting steps require running SQL queries directly on your WooCommerce database. Here's how to do this safely:
Installing the SQL Query Tool
- Install the Run SQL Query plugin from your WordPress Admin Panel.
- Once installed, navigate to Tools > Run SQL Query.
The interface will look like this:

Finding Your Table Prefix
WooCommerce tables may have a custom prefix instead of the default wp_. To find your prefix:
- Look at the list of tables shown in the SQL query tool.
- Find a table ending with
_posts(e.g.,mod488_posts). - The prefix is everything before
_posts. In the examplemod488_posts, the prefix ismod488_.
Running SQL Queries
When following troubleshooting steps:
- Replace the
wp_prefix in the SQL queries with your actual table prefix. - Copy the complete SQL query into the query box.
- Click Run Query to execute.
For example, if your prefix is mod488_, you would replace wp_posts with mod488_posts.
Need More Help?
If you're still encountering issues after following these steps, feel free to contact support@hubrise.com for further assistance.