PrestaShop
- home
- Apps
- PrestaShop
- Configuration
Configuration
The configuration page allows you to customise the behaviour of PrestaShop Bridge based on your preferences.
IMPORTANT NOTE: Due to its very customisable nature, PrestaShop Bridge requires a certain level of technical knowledge to configure. If you are not comfortable with the configuration, place a few different test orders, with various payment methods, and contact us at support@hubrise.com, mentioning the EPOS you are using. We will be happy to help you!
Language

Choose the language to use for generic items such as Delivery charge. These names may appear in your EPOS and in customer receipts.
Orders
Order Statuses
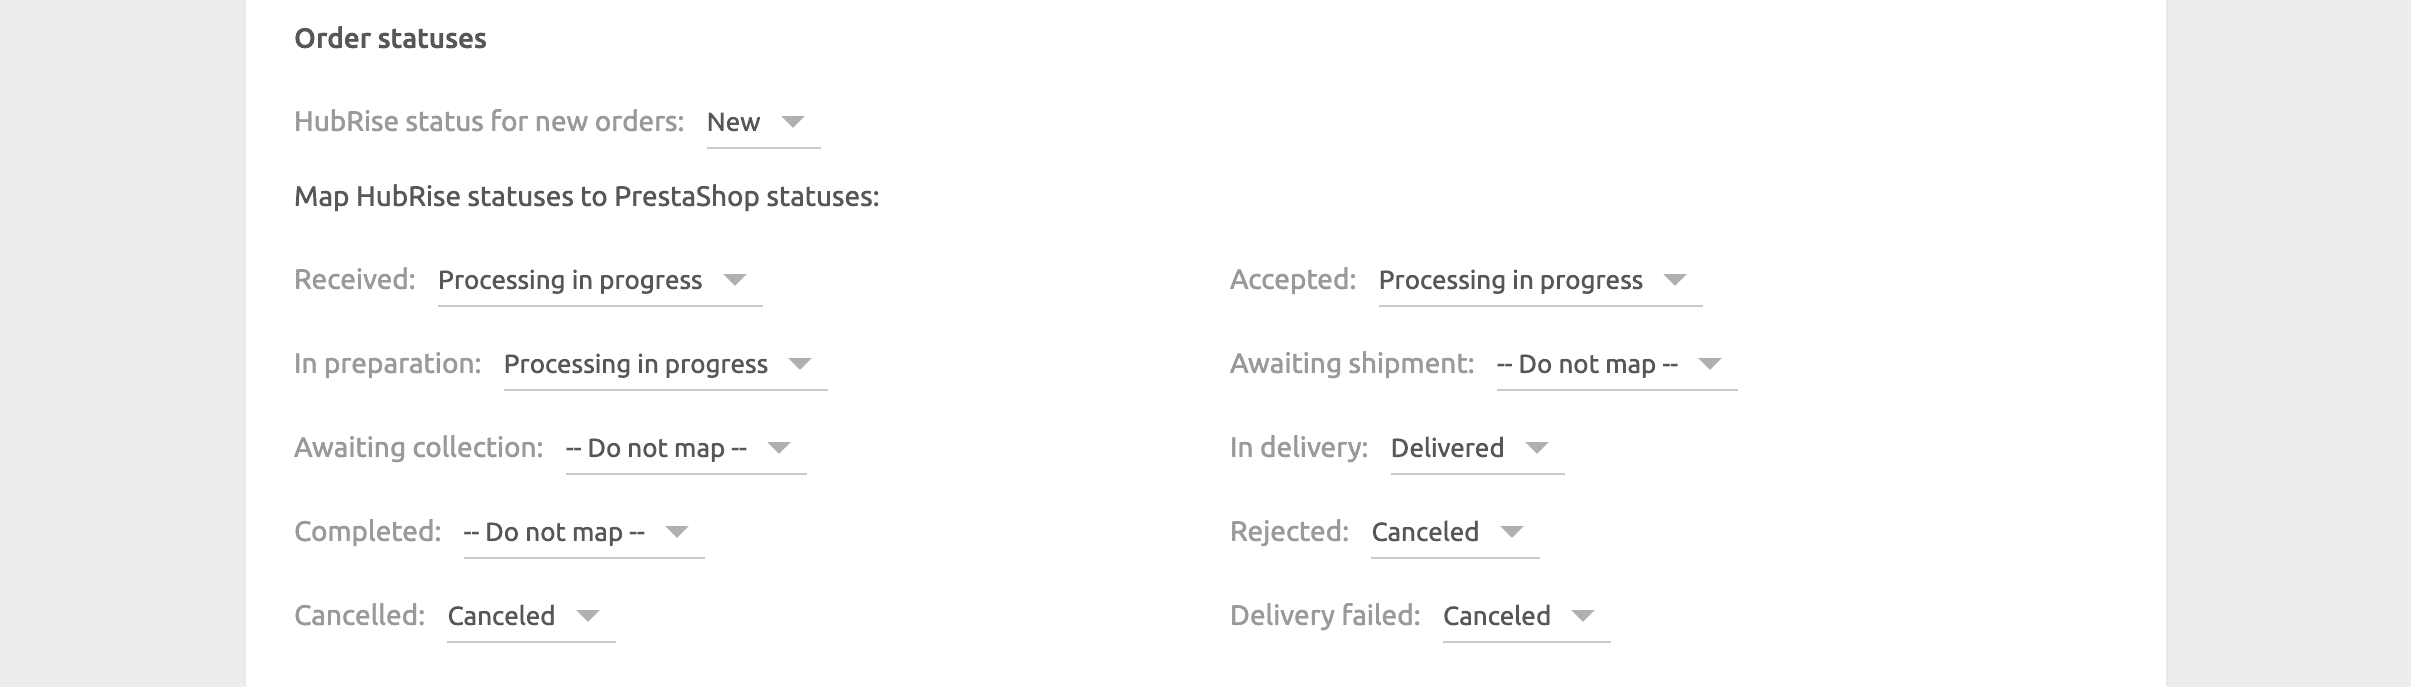
In this section, you can customise how status changes in HubRise are reflected in PrestaShop.
For each HubRise order status, specify the corresponding PrestaShop order status. To ignore a status change, select Do nothing.
Service Types

This section displays the list of carriers you have defined in your PrestaShop back office. You can specify the ref code for each carrier, which will be sent as service_type_ref in order JSONs. This ref code is used to identify the carrier in your EPOS.
Refer to your EPOS documentation on our Apps page to verify the correct codes to use.
Expected Time

PrestaShop offers native support for delivery dates. If you use this native feature, or if you don't use delivery dates at all, leave Values to use set to None, and PrestaShop Bridge will send delivery dates to HubRise as expected_time.
However, if you use a third-party PrestaShop module to manage delivery dates and times, you need to configure which table and fields contain this information in your database. This is explained in more detail in the Order Metadata section.
The Values to use drop-down menu lets you choose how expected times are encoded: One value containing both date and time, or Two values: one for date, one for time. Based on the selected option, one or two fields will appear, where you can specify the metadata field name(s) that contain the expected date and time.
If your module uses one metadata key, the supported formats are the following:
- An ISO 8601 string, for example:
2021-07-22T12:00:30+02:00 - A SQL date or time type.
- A Unix timestamp. For example:
1642422302.
If your module uses two metadata keys, the supported formats are the following:
- The date must be a parsable date or time, for example:
dd/mm/yyyy,yyyy-mm-dd, or an ISO 8601 string where the time part is ignored. - The time must be a parsable time, for example:
hh:mm:ss,hh:mm, or an ISO 8601 string where the date part is ignored.
Special Items

This section lets you specify the ref code used for PrestaShop gift items. It usually corresponds to a specific product in your EPOS.
Discounts

This section lets you specify the discount ref code applied to your products, in case you have active discount rules in your PrestaShop back office. Refer to your EPOS documentation on our Apps page to see how to obtain the corresponding ref code.
Charges

If charges apply, a ref code might be required. Refer to your EPOS documentation on our Apps page to verify.
In this section, you can specify the ref code for delivery charges, and for wrapping fees.
Payments

PrestaShop customers can pay for their order either online or by cash on delivery, depending on the modules you install in your PrestaShop back office. Online payments include payments by check, bank wire, or other online payment platforms like PayPal.
This section of the configuration page allows you to specify the ref codes for online and cash payments. Refer to your EPOS documentation on our Apps page to verify the correct codes to use.
Multi-Site

Configure this section if you support multiple stores from the same PrestaShop website.
Each location must be connected to PrestaShop Bridge and identified by a unique metadata value included in the order payload sent to HubRise. Orders are only forwarded to the location that matches the configured value. To include metadata in the order payload, you need to configure the HubRise module in your PrestaShop back office. For more information, see Order Metadata.
In the Metadata key for multi-site field, specify the metadata key used to identify the location.
In the Value(s) for this location field, specify the value associated with the location. You can specify multiple values separated by a comma.
Catalog
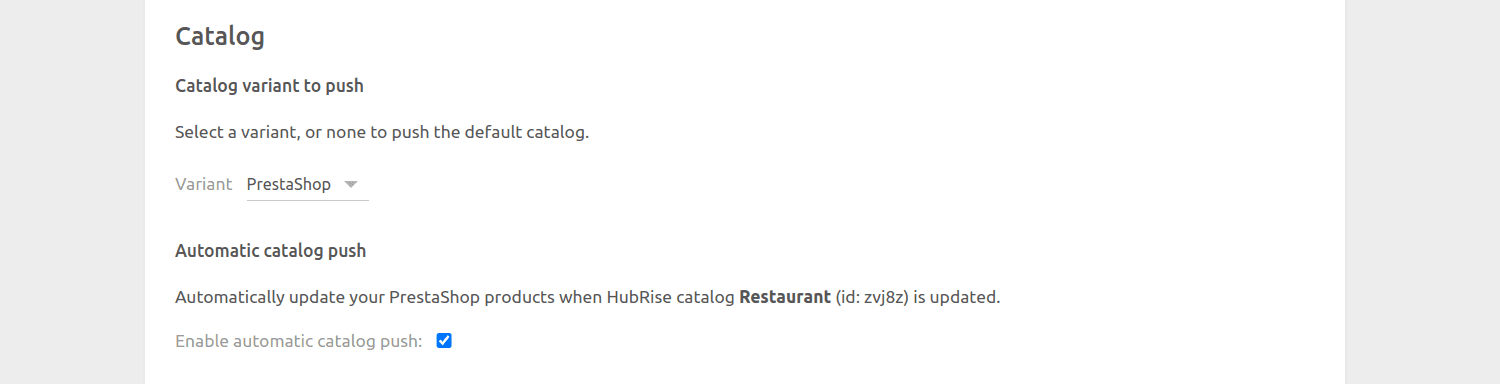
Catalog Variant to Push
Catalog variants give you the flexibility to disable specific items or adjust prices for your PrestaShop website. For more information, see Catalog Variants in our Catalog Manager online documentation.
If your catalog includes variants, you have the option to select which one to use. When (none) is selected, the default items along with their standard prices are used. If your catalog has no variants, the menu will be hidden.
Automatic Catalog Push
Select the Enable automatic catalog push checkbox to synchronise your HubRise catalog with PrestaShop whenever it gets updated.
Only new products added to the HubRise catalog will be sent to PrestaShop. Any existing products within PrestaShop will remain unchanged.
Inventory

Through inventory synchronisation, products that have a stock quantity of zero can be hidden on your PrestaShop website.
Select the Enable automatic inventory push checkbox to synchronise your HubRise inventory with PrestaShop whenever it gets updated.
Save the Configuration
To save the configuration, click Save at the top of the page.
Reset the Configuration
If you need to reset the configuration, click Reset the configuration at the bottom of the page.
IMPORTANT NOTE: Resetting the configuration will instantly disconnect the bridge from PrestaShop.
Resetting the configuration does not delete the operation logs displayed in the main page.
HubRise Module Configuration
The HubRise module is a free module that you need to install in your PrestaShop back office to connect PrestaShop to HubRise. To download and install the module, follow the instructions in Connect to HubRise.
To configure the HubRise module, follow these steps:
- Log in to your PrestaShop back office.
- From the menu, select Modules > Modules manager.
- Find the HubRise module, and click Configure.
The user interface of the HubRise module will appear.
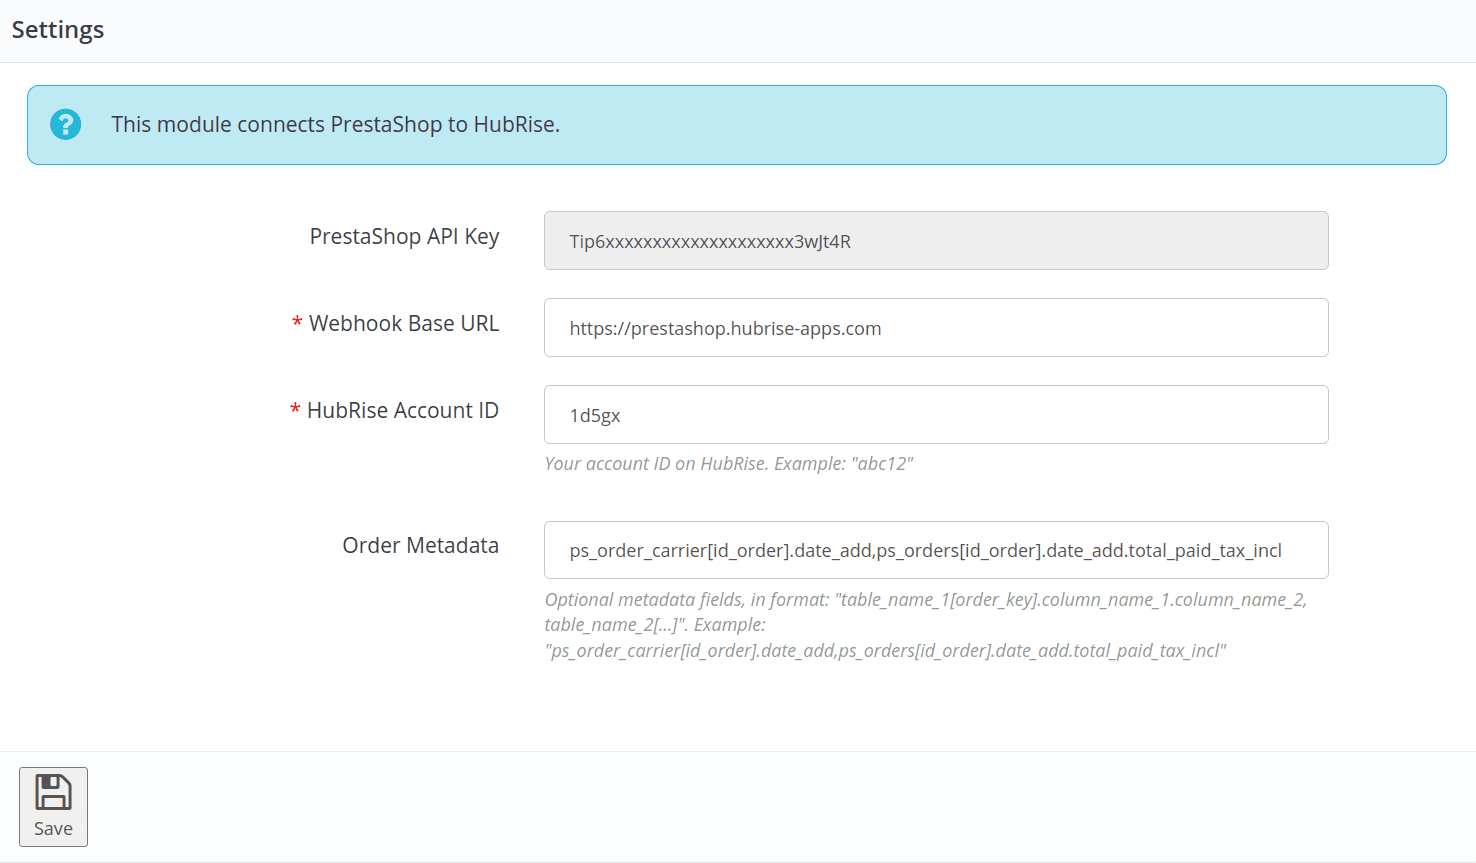
The page displays the following information:
- PrestaShop API Key: This is the API key you need to enter in the PrestaShop Bridge configuration page. This key is automatically generated when you install the HubRise module, and it cannot be changed.
- Webhook Base URL: This is the base URL of the webhook that your PrestaShop store uses to send order updates to HubRise. The default value
https://prestashop.hubrise-apps.comshould not be changed. - Account ID: This is the ID of your HubRise account.
- Order Metadata: This lets you specify which database fields should be sent to HubRise as metadata when an order is created. For more information, see Order Metadata.
To change the configuration, update the fields as needed, and then click Save.
Order Metadata
In order to support the widest possible range of PrestaShop modules, our PrestaShop module lets you pick some database fields to send to HubRise as metadata when an order is created. Metadata is then interpreted by PrestaShop Bridge based on the configuration of the bridge.
For example, if you use a PrestaShop module that adds a delivery time to your orders, you can specify the database field where the module stores the delivery time, and configure the bridge to pick up this field as the expected time.
Order Metadata Configuration
Configuring order metadata in PrestaShop Bridge generally involves three steps:
-
Identify the relevant database fields: Deter mine the database tables and fields that contain the data you wish to send as metadata. For a module managing delivery slots, you might have the delivery time stored in a table named
ps_prestatill_drive_creneau, withdayandhouras the fields representing the delivery date and time. Ensure that the table includes a column that links to the order ID (for exampleid_order), as this is a requirement for using a table as order metadata.If you do not have direct access to your database, see PrestaShop's Database Exploration Tool.
-
Configure the HubRise module: Within the module's settings, specify the database fields to be sent. In our example, set Order Metadata to:
ps_prestatill_drive_creneau[id_order].day.hour. This tells the module to fetch thedayandhourfields from theps_prestatill_drive_creneautable, linked to the order by theid_orderfield.The metadata is sent in the order JSON as follows:
{ // ... order fields ... "metadata": { "ps_prestatill_drive_creneau__day": "2021-07-22", "ps_prestatill_drive_creneau__hour": "12:00" }} -
Configure PrestaShop Bridge: The next step is to configure the metadata keys in PrestaShop Bridge, in the
table_name + "__" + field_nameformat. In our example, set Values to use to Two values: one for date, one for time. Two fields will appear, where you can specify the metadata field names; in this case:ps_prestatill_drive_creneau__dayandps_prestatill_drive_creneau__hour.
Testing the Configuration
When this configuration is complete, place a test order to ensure everything works correctly.
In case of any issues, follow these steps to troubleshoot:
- Review the order JSON to confirm the presence of the metadata fields.
- Check the PrestaShop logs for any errors related to the HubRise module. To access the logs, go to Advanced Parameters > Logs.
If you are unable to resolve the issue, contact us at support@hubrise.com. It could be helpful to create a temporary account for us in your PrestaShop back-office, so we can investigate the issue directly.
PrestaShop's Database Exploration Tool
If you do not have direct access to your database, PrestaShop provides a built-in database exploration tool.
To use the database exploration tool to explore your database, follow these steps:
- Log in to your PrestaShop back office.
- From the menu, select Advanced Parameters > Database.
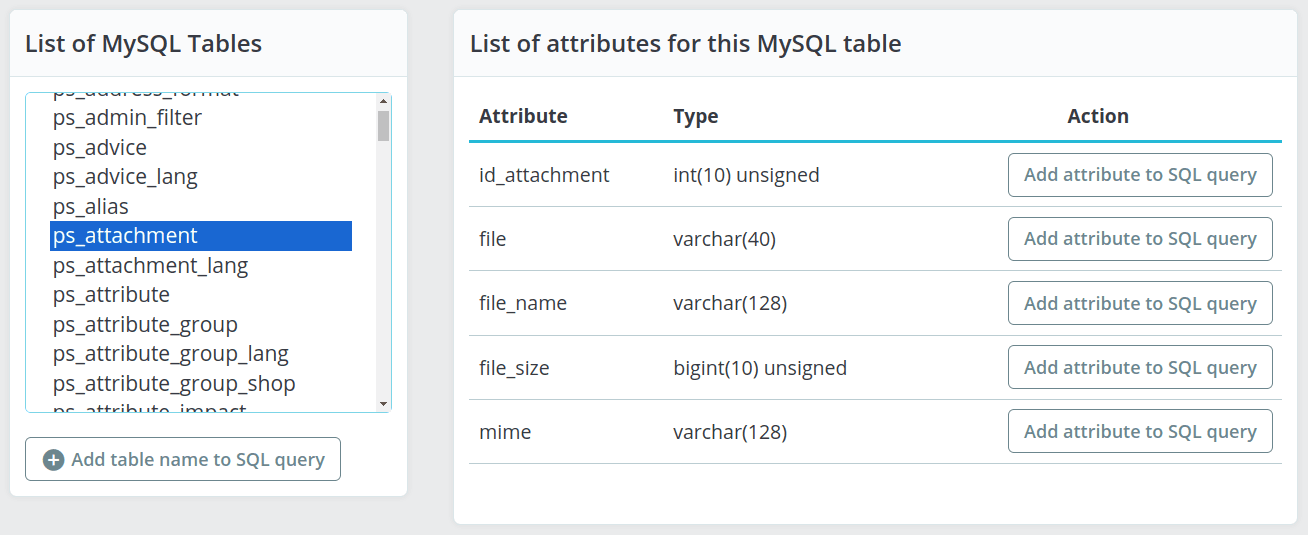
- Click Add new SQL query.
- Select a table in the List of MySQL tables section.
- The table's structure is displayed in the List of attributes for this MySQL table section.
To view the content of a table:
- Enter a temporary name in SQL query name.
- Enter
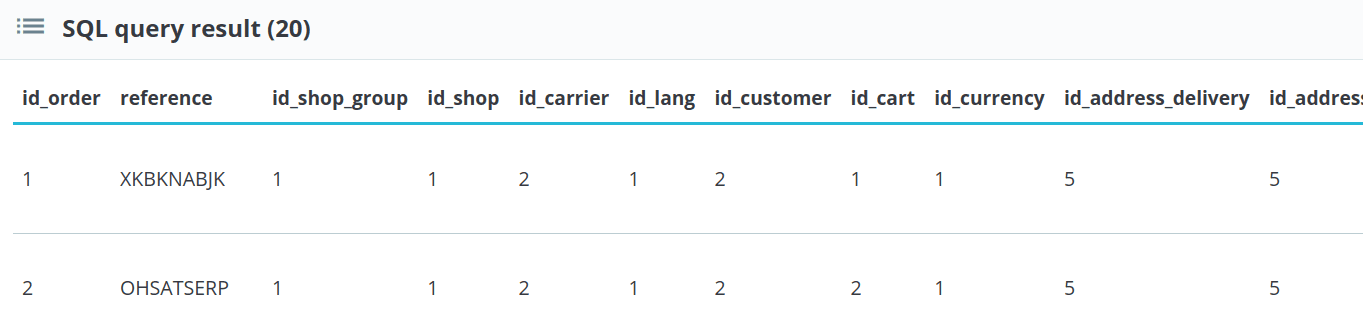
SELECT * FROM [table_name]query in the SQL query field, after replacing[table_name]with the name of the table you want to explore, and then click Save. - Search the query you just saved, expand the Actions menu, and click View.
- The content of the table is displayed, as shown in the following screenshot.